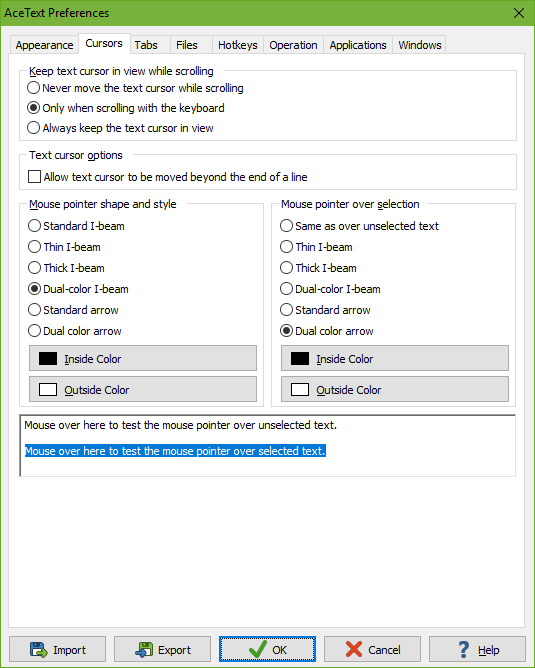
On the Cursors tab in the Preferences screen, you can configure AceText’s mouse pointer and some aspects of the text cursor. The other text cursor settings are part of the Text Layout Configuration that you can select in the Appearance tab in the Preferences.

“Keep text cursor in view while scrolling” determines what happens to the text cursor when you scroll the text. Normally, the text cursor will keep its position relative to the text when you scroll the text. This may cause the text cursor to be scrolled off-screen. Depending on your text editing habits, this may be desirable or undesirable. If you allow the text cursor to be scrolled off-screen, it will keep its position relative to the text. After scrolling, you can immediately continue typing at the same position. When you do so, the text will be scrolled automatically to make the cursor visible again. If you choose to keep the text cursor visible, it will be moved to the topmost or bottommost visible line when scrolling would otherwise have made it invisible. This way, you can always see exactly where the text cursor is pointing to.
By default, AceText will keep the text cursor visible when you scroll with the keyboard (by pressing Ctrl+Arrow Up/Down or Ctrl+Page Up/Down), but not when you scroll with the scroll bars or by rotating the mouse wheel. This is how most text editors for programmers work. AceText gives you the choice. Most general-purpose text editors do not allow keyboard scrolling at all.
If you turn on “allow text cursor to be moved beyond the end of a line”, you can position the text cursor after the last character of the line. If you press the right arrow key when the cursor is at the end of the line, it will move one position to the right. If you click with the mouse beyond the end of the line, the cursor will be placed where you clicked. If you start typing when the cursor is beyond the end of the line, AceText will automatically fill up the line with spaces up to the position where you started typing.
When you do not allow the cursor to be moved beyond the end of a line, pressing the right arrow key when the cursor is at the end of a line will move it to the start of the next line. When you click the mouse beyond the end of the line, the cursor will be placed after the last character on the line.
AceText also allows you to select the mouse pointer shape and style. “Standard I-beam” is the standard mouse pointer for text editing controls, typically an I-shaped beam. “Thin I-beam”, “thick I-beam” and “dual-color I-beam” are custom AceText cursors for which you can pick your own colors. By choosing colors that contrast well with the background color you’ve chosen for the editor, you can make the mouse pointer highly visible. “Standard arrow” is the regular Windows mouse pointer. “Dual color arrow” is another custom AceText cursor in the shape of an arrow.
AceText’s custom pointers may not work in all situations. E.g. some remote desktop software cannot handle them. The mouse pointer may either be incorrectly displayed, or simply be invisible. In that case, simply select one of the standard pointers, which will always work.