 Print CollectionPrint Collection
Click the Print Collection button on the main toolbar, press Ctrl+P on the keyboard, or select Collection|Print in the menu to print the entire collection. The first time you do this it shows you the Print Collection dialog where you can choose which kinds of clips and which parts of them should be printed. When you OK the Print Collection dialog you see the Print Preview. The printout starts when you click the Print button in the Print Preview.
When you make a printout, AceText remembers your settings. If you’ve already printed a collection then the Collection|Print command immediately shows the Print Preview. You can click the What to Print button on the Print Preview to show the Print Collection dialog again to change which kinds of clips and which parts of them to print. If the current collection or selections doesn’t contain any clips of the kinds you included in the preview printout, then the Collection|Print command does show the Print Collection dialog before the Print Preview dialog.
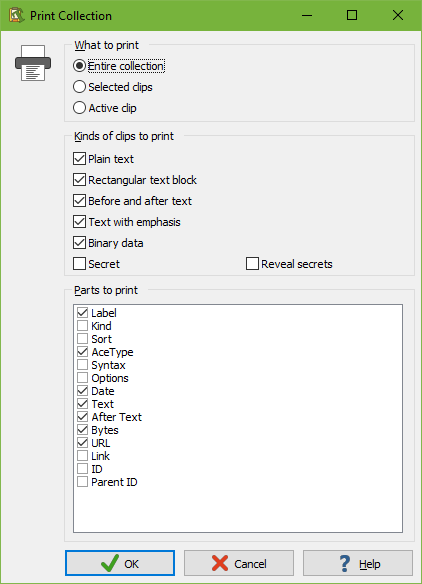
You can choose to print all the clips on the active collection tab, or the clips you’ve selected in the clip tree, or just the clip being shown in the AceText Editor. If you want to print all clips in all open collections, switch to the All Collections tab before printing. If you only want to print the body text of the active clip without anything else, use the  Print Text item in the Text menu instead of the Print item in the Collection menu.
You can also choose which kinds of clips to print. If you deselect a certain kind of clip then no parts of clips of that kind are printed at all. If you deselect all clip kinds then only folders are printed. This can be useful to print an outline of a large collection.
For secret clips there is an extra option whether the printout may reveal secrets. If you tick "reveal secrets" and also tick the "text" part then the printout will reveal the text of all the secret clips that you're printing. If you tick the "secret" kind but untick "reveal secrets" then the printout includes all the parts of secret clips except for the "text" part. This can indirectly reveal that your collection contains secret clips as the “text” part will be printed for other kinds of clips but not for secret clips. But the secrets themselves won’t be revealed.
Finally, you can choose which parts of the clips that you want to print. The printout will arrange the parts similarly to how they are arranged in the AceText Editor. The “label”, “kind”, and “URL” parts apply to both clips and clip folders. The “sort” part only applies to folders. The “AceType”, “syntax”, “options”, “date”, “text”, “after text”, and “bytes” parts are the various clip parts that you can edit in the AceText Editor. The “text” part also covers the “before” text of “before & after text” clips. The “link” part is the link that is generated by the  Edit|Copy Link command. The “ID” part is the item’s unique ID used by the Copy Link command. The “parent ID” parts is the ID of the folder that contains the item. Links and IDs are printed for both folders and clips if you select those parts.
With the media player buttons at the top, you can browse through the pages that will be printed. You can also press the Page Up and Page Down keys on the keyboard. If it shows that zero pages will be printed, click the What to Print button to select clip kinds and clip parts to print.
The magnifying glass buttons zoom the preview in and out. You can also press the plus and minus keys on the numeric keypad on your keyboard. Zooming does not affect the printout. It only affects the preview. At low magnification, the preview may not be very accurate. Colored backgrounds may have small gaps and edges of characters may be clipped. That is because the printout is based on the printer resolution. Printer resolution is generally many times higher than the screen resolution. If you zoom out the screen doesn’t have enough resolution to accurately show the preview. The actual printout will be pixel perfect regardless.
The margins can be changed by moving the mouse over one of the dotted blue margin lines. The mouse pointer will change to indicate that you can move the margin. A hint box will indicate the size of the margin in centimeters and inches. Click on the line, hold the mouse button down and drag the line until it indicates the desired margin position.
If you want to print with a different font or different text spacing, click the Font & Layout button. This button shows the same text layout configuration screen as the Edit buttons for the text layout configuration in the Appearance Preferences. The difference is that it shows the text layouts you have configured for printing rather than the ones you’ve configured for editing. Another difference is that if you turn on the “allow bitmapped fonts” checkbox, the font list will include printer fonts rather than screen fonts in addition to the TrueType and OpenType fonts that work everywhere. A “printer font” is a font built into your printer’s hardware. If you select a printer font then you should set “text layout and direction” to “left to right only” for best results.
Press the Setup button to access your printer’s setup screen or to select a different printer than the default printer.
“From page” and “to page” determine the range of pages that will be printed. The value of “from page” must be smaller than or equal to that of “to page”, even if you want to print in reversed order (see below). “Copies” is the number of copies that should be printed of each page.
Activating “All pages” will print all pages in the range specified by “from page” and “to page”, while “odd pages” will print only the odd-numbered (1, 3, 5, ...) pages in the range, and “even pages” only the even-numbered (2, 4, 6, ...) ones. If the page range is only one page (“from page” equals “to page”) and that page is odd-numbered while “even pages” is activated, or the other way around, nothing will happen when you click the Print button. You will not get an error message.
If you tick “Reversed” then the pages will be printed from last to first instead of from first to last. This can be useful if you have an inkjet printer that puts pages in reversed order in the out tray.
If you have a monochrome printer or if you do not want to waste expensive color ink cartridges, tick “Black and white” to print everything as black text without any background colors. Bold, italic, underline, and strikeout styles selected in the color palette will remain. Underline and strikeout colors will be blank.
You can click the Color Palette button to select a different set of colors. You should select a palette that uses a white background. If you print on colored paper then you should still select a white background in AceText. AceText cannot determine the color of your paper. White is assumed. If the print preview shows a colored or even a black background then the actual printout will also have the same colored or black background. This can waste large amounts of ink. If you click the Print button and the background isn’t white then AceText will warn you about this (if you didn’t previously tell AceText not to warn about ink usage again).
The Color Palette button shows the same color selection dialog as the corresponding button in the Appearance Preferences. If you edit any palettes, those changes also affect the palettes used for editing. If you want to use different palettes for editing and for printing, create new palettes for printing instead of editing existing ones.
Click the “Print” button to start printing. If you’ve printed all pages then this also closes the print preview.
Click the “Close” button or press Escape on the keyboard to close the print preview. If you close without printing then AceText does not remember your text layout or color palette choices.
Click the “Headers” button in the Print Preview window to change the headers and footers to be printed, if any.
The headers and footers are printed inside the margins specified on the print preview. If no headers or footers are specified, their space will be claimed by the text body.
A few special placeholders are available in the headers and footers:
| %P | Page number of the current page. |
|---|---|
| %N | Total number of pages. |
| %D | Current date, printed using the short date format specified in the regional settings in Windows. |
| %T | Current time, printed using the short time format specified in the regional settings in Windows. |
| %FD | Date the collection was last modified, again printed in short date format. |
| %FT | Time of the day the collection was last modified, again printed in short time format. |
| %FP | Full path to the collection being printed: folder + file name. |
| %FN | File name (without folder name) of the collection being printed. |