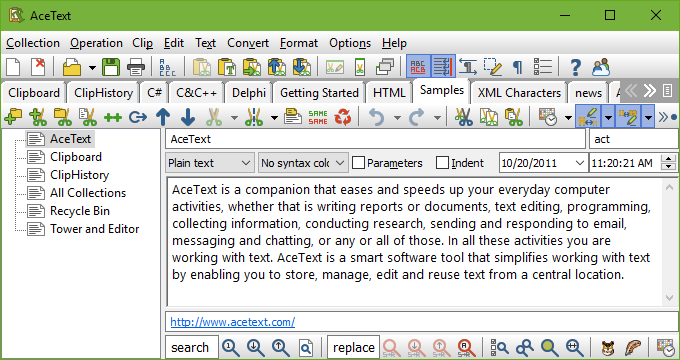

When you open an AceText Collection, or create a new one, a new tab appears for that collection.
At the left-hand side, tree view shows the list of folders and clips in the collection. You can use drag and drop to arrange items in the collection, or use the  Move Up and
  Move Down buttons or their keyboard shortcuts. To add new items, use the
  New Folder,
  New Subfolder,
  New Clip,
  Paste as New Clip or
  Create Clip from Text File buttons. You can also drag and drop to transfer text from another application into AceText. Use the AceText Tower if you want to see more clips than the tree view can show in its limited space.
Press the Control+Arrow Up or Control+Arrow Down keys on the keyboard to quickly walk through the list of clips. These hotkeys work even when the tree view does not have keyboard focus.
You can select several items in the tree, with the restriction that all selected items need to be inside the same folder. To select a range of items, click on the first item you want to select, then press and hold the Shift key on the keyboard, and click on the last item in the range. To add a single item to the selection, or to deselect it, press the Control key on the keyboard, and click on the item. If you selected all the items in a collection, the only way to deselect them is to press the Control key while clicking on an item. Then you can click again on that item without pressing the Control key, to select that item and deselect all others.
When you select multiple items, the last one you clicked on is the active item. This is the item that you can edit. When a folder is active, the right hand side of the tab page shows an edit box for the folder’s label. When a clip is active, the right hand side allows you to edit the clip.
In the Label box, enter the label that should identify the clip in the list of clips. If you do not enter a label, the first few dozen characters of the clip’s text are used instead. In the AceType box, enter the AceType abbreviation for the clip. Assign a memorable abbreviation to be able to quickly paste the clip using AceType. Abbreviations are case insensitive.
AceText supports several different kinds of clips. Most of the time, you will work with plain text clips. The other kinds are useful in conjunction with AceText-aware applications.
If you change a clip’s kind into “before and after text”, the clip’s text is split at the position of the text cursor in the edit box.
Clips other than “text with emphasis” can use a syntax coloring scheme to automatically highlight the structure of the text in AceText. The highlighting itself does not become part of the clip. It is still only plain text.
Mark the option “indent” if the clip consists of multiple lines, and you want the second and following lines to be lined up with the first line, when the clip is pasted into an AceText-Aware application. When pasting into an application that is not AceText-aware, the “indent” option has no effect. The “indent” option for a clip also turns on automatic indent for the editors to edit the clip’s contents.
The search box and buttons at the bottom of the ClipHistory tab page enable you to search through and filter the ClipHistory. Enter a search term and click the Find Next or Find Previous button to search for it. You can click the Search Options button to choose which parts of each clip to search through, and whether to search through only the active clip or all clips. If no clip can be found, the button you clicked briefly flashes a “stop” icon.
When you click the Filter button, the clip tree only shows those clips that contain your search term in the clip parts you told AceText to search through. If you change the text in the search box, the clip tree is automatically updated to show only those clips containing the new search text. Click the Filter button again to turn off the filter and make the list show all clips again.
The toolbar on an AceText collection tab page shows the following buttons:
 New Folder
 New Subfolder
 New Clip
 Create Folder from Disk
 Create Clip from Text File
 Duplicate Clips
 Move Clips
 Move Up
 Move Down
 Move to Top
 Move to Bottom
 Reverse Clips
 Merge Clips
 Split Clips
 Extract Label
 Delete Duplicate Clips
 Cut Clip to Clipboard
 Copy Clip to Clipboard
 Paste as New Clip
 Insert Date & Time
 Auto Adjust Case
 Auto Adjust Quotes
 Visualize Spaces